Measure virtually any material with the latest non-contact
sample thickness measurement gauge technology.
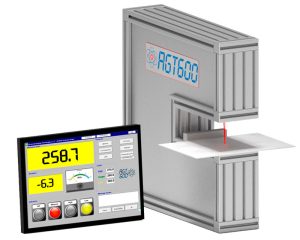
 The AGT600 Lab non-contact sample thickness measurement gauge is designed to be a simple and accurate measuring system. It is a perfect fit for QC departments, labs or line side on shop floors where a quick and accurate thickness measurement of samples is needed.
AGT advantages:
- Eliminates inaccurate or inconsistent measurement of samples by hand.
- Eliminates recording error of handwritten measurements.
- Eliminates sample damage or compression due to measurement contact.
- Can measure through transparent protective coverings or coatings.
- Measures any type of solid material. (metal, wood, plastic, composite, laminate, paper,…)
Functional features:
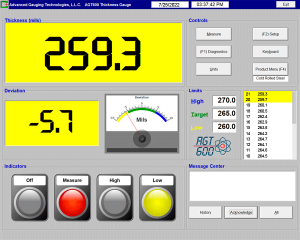
- A simple touch screen provides instant thickness and deviation information.
- The product menu allows for different sample types to be selected and preset saved limits.
- Each sample measured and captured is recorded.
- No limit to the number of samples that can be captured and recorded.
- Exceeding the entered target thickness values and limits will provide a visible indication on the screen and be recorded.
- Recorded data available for any spreadsheet or QC analysis program.
The AGT600 Lab is a non-contact laser thickness gauge and has no sensitive mechanical parts. The system produces accurate and repeatable thickness measurements. Maintenance is as simple as keeping the sensor heads clean and occasional calibration check.
Contact us today to get your AGT600 Lab
Our specifications below reflect real-world accuracy and performance not laboratory conditions specified by some other companies.
Features
Our simplified hardware design combined with Keyence’s ultra high speed, high accuracy laser sensors make the AGT600 Lab the most reliable laser gauge in the industry.
The AGT600 Lab can be setup on a desk or bench in minutes. For shop installation the gauge can be mounted in a number of ways using the T-slots in the frame. The touch screen can be mounted to the gauge, set on the desktop or mounted anywhere within 300 ft. of the frame
Our system features a fast and accurate calibration method, called ISOcal™ that establishes calibration over a range of samples and reports its calibration accuracy. Our calibration procedure uses N.I.S.T. certified and traceable ceramic samples.
The AGT600 Lab has laser sensors above and below to provide true thickness measurement even with uneven or non-flat samples. A bent sample will give an inaccurate thickness measurement from single top reading gauges.
Operational Functionality
Options
The N.I.S.T. traceable sample includes a set of four, ceramic samples — certified and traceable to N.I.S.T. standards.
The custom calibration sample holder includes a black anodized finish.
Specifications
| AGT600 Lab Sample Thickness Laser Gauge | ||
|---|---|---|
| Precision | Standard | |
| Material Thickness | .003 to .250” (.06 to 6.3 mm) | .004″ to .400” (.10 to 10 mm) |
| Air Gap | 2.79” (71 mm) | 3.00” (76 mm) |
| Measurement Range | +/- .28” (+/- 7 mm) | +/- .47” (+/- 12 mm) |
| Accuracy | < 3.3 µm (0.13 mil) |
< 5.3 µm (0.21 mil) |
| Resolution | < 1 µm (0.4 mil) | < 1 µm (0.4 mil) |
| IEC/IFDA (CDRH) Laser Class | Class 2/Class II | Class 2/Class II |
| Temperature Range | 0 to 50° C (32 to 122° F) |
0 to 50° C (32 to 122° F) |
| Relative Humidity Range | 35 to 85% (no condensation) |
35 to 85% (no condensation) |